Saturday, 13 February 2016

WHY USE A BENTONITE CLAY MASK?


bentonite clay face mask
I love a face mask and I try to use them weekly. Usually I use lush face masks or I been known to try all kinds of homemade masks but not so long ago I discovered a simple homemade detoxing face mask and its amazing! Its SUPER easy to make as theres only TWO! ingredients, it leaves your skin feeling soooo soft and it has amazing health benefits to your skin.
You sold yet?

The ingredients to this mask are:
Bentonite clay and apple cider vinegar (or water is just fine as an alternative)

and that is literally it!

Bentonite Clay also know as "Healing Clay" is extracted from volcanic ash. When mixed with liquid the clay creates a electrical charge and draws out toxins (such as heavy metals we build up from eating processed foods and even in the air) from your skin and body. The clay also has other benefits which include:

Contains many minerals 
Heals and regenerates the skin
Treats acne (prevent breakouts and help clean up acne)
Unclogs and shrinks pores 
Prevents blackheads 
Even out skin tone 
bentonite healing clay
When mixing your mask its advised that you use a non metallic bowl and mixing utensil so this can be glass, wood, plastic, just not metal as it can reduce the masks effectivity by binding to the metal. I use a bamboo bowl and a wooden spoon from my kitchen.
bentonite healing clay face mask essentials
One tip I have when using this mask is ignore all natural urges to scrunch your face up and crack your mask. This results in becoming itchy to the point I wanted to take it off however if you don't crack it it doesn't itch at all.  You'll feel it tightening but just let the mask do its magic. I leave the mask on for about 20 minutes but its up to you how long you want to leave it on. you skin may look a bit red after washing the mask off (this happened to me once and redness was minimal)  this is totally normal and goes away in no time. the mask is absolutely suitable for sensitive skin it just advises that you leave it on for a shorter amount of time. 

You can also use bentonite clay in your bath for a detoxing bath or use it in a foot bath. Another great way to use it which I have tried myself is to use it on your armpits this can help draw out the heavy metals that are in your deodorant, which have been known to be a cause of breast cancer. You might want to do the armpit detox just before getting in the bath as cleaning up could get messy. 

You can buy the the clay here
and the apple cider vinegar here
if you want a bamboo bowl similar to mine you can one here
( any wooden bowl will do just fine) 


Share:

Tuesday, 9 February 2016

MAC PRODUCTS I RECOMMEND BUYING AND NOT BUYING

mac make up logo

Hi guys I thought id share with you the mac products I've used and which ones I think are worth buying and which giving a miss.

I love the colour and quality of my eyeshadow however I wish it lasted longer the colour I have has a light shimmer to it so I wonder if the matte shadows would last longer I will defiantly give them a try. I would recommend this product however I do feel you may be able to get the same quality somewhere else cheaper. Sorry Mac!

Mac pigment is great it lasts ages and is bursting with colour the ONLY down side it as its loose powder it can give you the line on your eyelids where the product gathers. I advise to use a eye primer with this and maybe even mix a drop of eyelash glue into the amount you want to apply to give it extra strength. I would recommend this product.

I love my mac lipstick!!! Im sure everyone thats owned one will agree they're are great quality lipsticks defiantly recommend you add at least one to your make up bag.

Mac lip pencils are great they are good quality have great colours and the pencils are quite long so they last a good while. I would recommend this product.

When I first used this product I loved it. It was good quality and I loved the colour it suited my eyebrows perfectly however it didn't last long at all the amount you get in the applicator is A LOT less than I expected. I stopped buying this as unfortunately I didn't feel it was worth the money for the amount of product you get, over all i recommend the product but not at its current price.

I found this foundation too thick it felt really heavy on the skin and had kinda of "foundation smell" to it. I don't feel this foundation is good for dry skin and overall I wouldn't recommend this foundation.

I liked the feel of this foundation on my skin I found it complementing to my dry skin I like the coverage it gives and overall would recommend this product.

I bought this product in the lightest shade however I still didn't find it light enough to get the desired highlighting effect i wanted to achieve. also i feel there are other product on the market that are of the fairly same quality at a cheaper cost.

I found this concealer great its gives excellent coverage it was nice and creamy (how i like my concealers) i feel it is priced fairly for its quality and id defiantly recommend this product.

I havent actually owned any mac brushes but I have used lots (thanks mum) I find their brushes to be good quality no bristles falling out all the time ect however they do come at a price a price. I feel you could defiantly find the same quality somewhere else much cheaper my favourite brushes at the moment are Real Techniques they are great quality, will last long and i feel are reasonably priced. You can buy sets of these brushes a save money.

What are your favourite/worst Mac products?

Share:

Wednesday, 3 February 2016

SUPER SMOOTHIE RECIPE & ITS HEALTH BENEFITS

Spinach, Apple, Orange, Pear, Yoghurt & Barley Grass Smoothie
homemade healthy smoothie
1x Apple
1x Orange
1x Pear
2 handfuls of Spinach
3-5 dessert spoons of Yoghurt
1-2 dessert spoons of Barley Grass
Apple juice or Water or Ice for a extra cold smoothie
smoothie ingredients
First wash all of the ingredients before use, then cut them up into chunks ready for blending.
smoothie ingredients
Now add all chopped up ingredients to your blender cup then add the yoghurt, barley grass and your apple juice, water or ice (I used half water half apple juice for this smoothie) .
smoothie ingredients
Now blend all the ingredients together in your blender.  

Here are some of the possible health benefits from each ingredient of this smoothie:

Apple -
Reduce the risk of Alzheimers/Parkinsons/Dementia/Strokes
Prevents Cancer
Decrease the risk of Diabetes
Reduce the risk of Cholesterol
Promotes good heart health 
Helps in the prevention of  Gallstones
Relives Constipation
Neutralise IBS
Control weight
Detoxify your Liver 
Helps in the prevention of Cataracts
Promotes good lung health

Pears -
Helps prevent high blood pressure
Helps prevent Cancer
Lowers Cholesterol
Promotes good colon health
Relives Constipation
Promotes good energy levels in the body
Relives Fever
Boosts immune system
Anti inflammatory effects on the body
Helps in the Prevention of Osteoporosis

Spinach-
Helps prevent cancer
Helps prevent asthma
Lowers blood pressure
Promotes good bone health
Promotes good skin/hair health
Aids constipation
Anti-inflammatory properties
Promotes good brain health
Promotes good eye health
Good source of iron

Orange-
Helps prevent cancer
Helps prevent kidney diseases
Lowers cholesterol
Promotes good heart health
helps fight viral infections
Promotes good eye health
Lowers blood pressure 
Alkalizing effect on the body
Promotes good skin health
Good for diabetics

Bio Live Yoghurt-
Best known for its great effects on the digestive system
Boosts immune system
High levels of calcium
Aids IBS
Lowers blood pressure

Barley Grass -
Anti-oxidant power
Boosts immune system
Helps prevent cancer
Protection from free radicals
Fights addictions and cravings
Alkalizing effects on the body
Rich in Vitamin E, Iron and Zinc

(I have collected this information through my own personal research on the internet)

Hope you all enjoy this recipe and feel the benefits!
Share:

Wednesday, 27 January 2016

MY FAVOURITE TANNING PRODUCTS & TOP TANNING TIPS FROM A PRO

I could not live with out fake tan (first world probs) I wear it literally everyday.
 I'm naturally quite fair skinned and having a tan just seems to make everything look better (well in my opinion). So as I've used it for many years and I'm qualified in spray tanning i thought id share with out my top tanning tips and also my favourite tanning products as I've tried literally all there is to try out there.

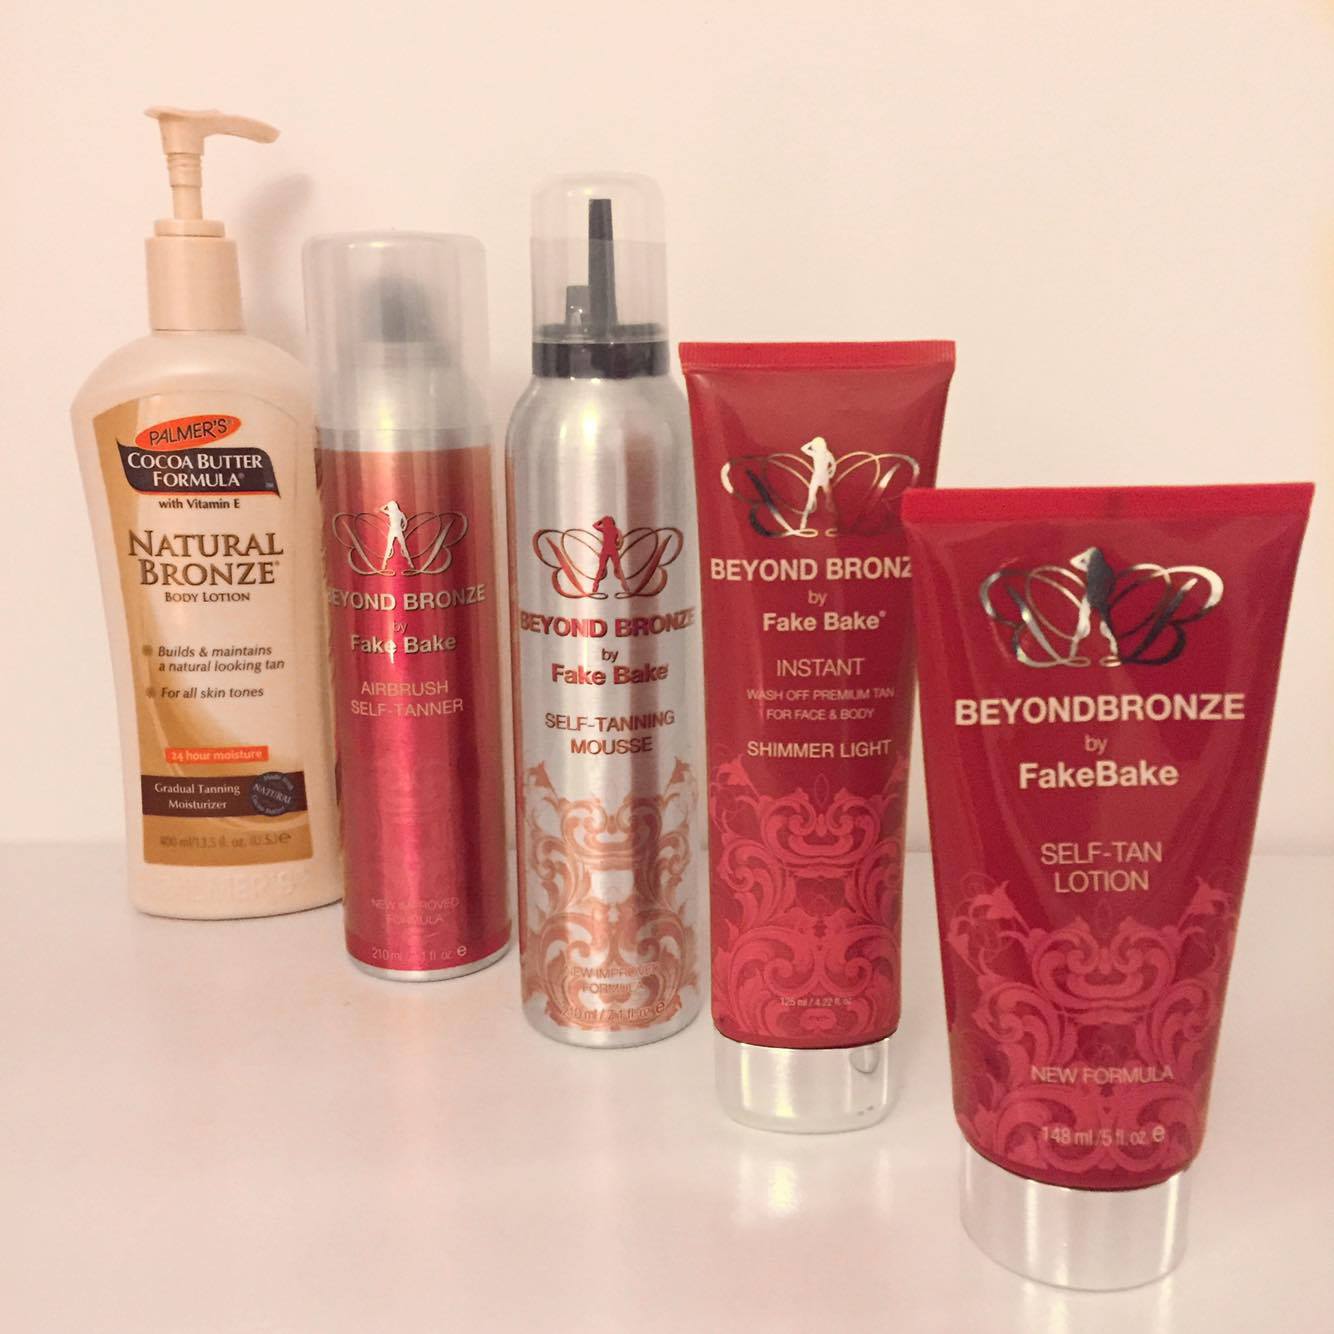
fake bake tanning products

My Top Tanning Tips:
For All Types Of Tan

Shake the bottle before use-
Make sure your tan is well mixed so you dont end up with funny colours or patches

Ensure all deodorant is removed before application-
You could end up with green armpits and lines showing where your deodorant has been applied, i have learned this the hard way.

Shave the day before hand (or at least a few hours before tanning)-
If you shave just before hand its likely you will get little spots of tan in the pores of your leg hairs no one likes spotty legs. You could shave after your tan has developed (providing its a developing tan) however shaving can cause alot of the tan to come off on your legs so you may end up with legs slightly lighter than the rest of your body.

Exfoliate before tanning
Try to exfoliate the day before hand or at least a few hour before hand. Pay particular attention to your knees, elbows, under arms, hair line and ankles these bits are prone to being dry and gathering tan they're the first places to start to go patchy exfoliating removes the dead skin cells and the chances of this happening.

Wear a tanning mitt with a latex glove underneath
A mitt gives a even finish to the tan it does so better than just a latex glove, however i always use a latex glove underneath as using the mitts alone usually give you tan hands! If you cant get your hands on a tanning mitt you could use a clean old sock the thicker the better!

Ask for help with tanning your back or use a self tan back applicator
The cheap and cheerful way to ensure u have a even tan and get to the hard to reach places is to ask for help maybe from a partner or friend or member of your family. If your unable or do not wish to ask for help you can use a self tan back applicator (will be linked below) 

Apply tan to your mitt/glove first
applying to your mitt/glove first allows you to get the right amount of tan before applying it. if your squirt too much tan out you can always wipe it off your mitt or glove however wiping it off your body may cause problems with a even application.

Wipe your Nails after applying your tan
Your nails (hand and feet) will react to the DHA in fake tan and turn a discoloured browny orangey colour. Wiping them clean after minimises the risk of this. 

Make sure your skin is not wet from water or moisturiser
This may stop the tan from developing properly in these areas, water may also cause streaks.

Dont use oil/ oily products on your skin before or after tanning 
Oil is tans arch nemesis it blocks tan from developing if applied before tan and fades tan when applied once tanned. 

Avoid over tanning your hand and feet
 A lot of people make this mistake use a little bit of tan for these areas and bend your knuckles when applying tan to your hands also get in between your fingers and toes as this is usually where patches occur. Never tan the palms of your hands tan is like super developy (yes i did just create that word) on the palms of your hands.

When showering wash just the bits that matter 
When showering off your tan and showering in the time that you want your tan to remain full of colour try to "get in and get the job done" dont hang around singing into a shampoo bottle the longer your in there the more time that tan has to fade. also try to just apply soap to the bits that matter i call these your "Pits and Bits" which is your armpits and intimate area ( i also include my feet)

Bend your elbows and knees when applying tan to them
If you dont bend your elbows and knees when you apply tan to them you may end up with lines of untanned skin where your skin gathers together this is a ultimate tanning fail 

Apply small amounts at a time
By applying small amounts at a time you allow yourself adequate time to work that tan into the skin and get a even finish you can always keep applying more tan to get a darker colour however removing too much tan that has been applied is much more tricky and you can find yourself in a right kafuffle! 

For Developing Tan

Moisturise dry areas 10 minutes before application using oil free moisturiser
By moisturising these areas the tan is less likely to go patchy during the time you are tanned. using a oil free moisturiser means there is no oil in your skin to block the tan from developing properly. Ensure all your moisturiser has be absorbed and your skin is not wet before apply tan.

Use talc if your worried about your tan transferring onto clothing 
in emergency cases when you have to tan last minute and your wearing something that your worried about the tan transferring onto your clothes you can pat it down with a little talcum powder.

Avoid washing up or brushing your teeth in the tan development time
washing up will wash off your tan from your hands (obvs) and brushing your teeth may give you that awful ring of white around your mouth, not pretty! my advise is dont think oh ill just be really careful brushing i have tried and failed at this also and was left with a line down my chin from my mouth.


For Moisturising Gradual Tan

Apply in a sequence from bottom to top
As you cant see where you've put your moisturising tan on its best to do it in a sequence i start from the bottom to the top using circular motions 

Go over the places you've tanned with your hands 
Once ive tanned i go over the places ive put my tan on usually my whole body and with my gloves just massage the moisturiser in more to ensure ive got a even coverage.

For Tanning Mousse

Work fast
Mousse dries the quickest out of all the tans when its applied to skin so you have to run it in quikly ensuring your using circular motions. 

Use small amounts of tan when applying
It is most important to use small amounts of tan when applying mousse as it dries much quicker you have less time to work it into your skin. Having too much can mean some serious streaking

For Instant Tan 

Do washing up and brush your teeth before tanning
just like all other types of tan its best to avoid washing up or brushing your teeth as your instant tan will be able to streak during the duration you are tanned its best to do these two things before tanning and in fact any other activity that involves water!

Use moisturiser to clear up mistakes 
If you get a even application of instant tan in one your a lucky thing! you may find you have a slight patch or too much tan in one area just use a little oil free moisturiser and rub it in to patch up these mistakes you may find you want to mix a little moisturiser and tan together in your hand before applying to your skin. Use a little bit at a time as you can always add more as you go along.

Check the weather
I advise you to check the weather before wearing instant tan all together. make sure you dont find yourself stuck in the rain with instant tan on and no umbrella or clothes to cover up all of your skin as you will become a human dalmatian and no one needs that kind of humiliation. 


You can shop all my favourite tanning products here ...

palmers natural bronze gradual tan
This is my favourite moisturising tan and i use it as my everyday tan i find this one is the least streaky/patchy that ive used. Ive also used others that have given me more of a orangey colour i prefer the colour this one gives me. Also a lot of gradual tans take a good 3 days to build up a half decent tan. if you need a deeper tan in a shorter time you can apply a layer of this and then wait until dry and apply another it should give you some pretty good results compared to the other gradual tans out there. 

fake bake airbrush self tanning spray
I love all fake bake products they in my opinion give the best colour I love a brown natural looking tan I dont really like orangey tans Fake Bake will not let you down on colour!
This tan  is a "show where it goes"  tan so you will be able to see where your applying it to. After application you will be a little tanned however this tan develops over a few hours for best results sleep in this tan and wash off in the morning. This bottle has a 360 degrees nozzle. 
Shake before each spray and wipe the nozzle before and after each application 

Although this tan is in a handy spray bottle I would advise you to have your glove and mitt either to hand or on your other hand not using the spray bottle. If you spray a little too close or too much you may just need a little dab of the mitt.

Best to use this in a bathroom or toilet as spray will get on to objects surrounding you try standing in the bath, shower or sitting on a towel. Make sure room is well ventilated.

fake bake beyond bronze self tanning mousse
This is another "shows where it goes" tan that aslo develops with time. This will provide a deep tan when applied but it will also develop a little so you will need to wash off the little excess tan. This tan should last about 5 days when applied correctly.

Must use gloves with this tan and a mitt is highly recommended.
Shake until you cant hear the liquid moving inside anymore before each squirt.

fake bake beyond broze self tanning lotion
This tan is fairly similar to a instant tan it gives full instant colour and works into the skin the same as a instant tan lotion, however this tan does develop onto the skin and a night time application is recommended. You may get a little tan wash off in the shower but you will be left with a lovely bronze tan you can deepen this tan but applying everyday until you have your desired colour.

fake bake beyond bronze self tanning instant lotion
Please Note: pictured is the tan in shimmer light I would recommend Matte Medium (they also do Matte Light) The link is to matte medium.

This tan gives a lovely brown tan you can achieve a deeper tan by putting on another layer once the first layer is dry it is better to apply two light coats as appose to one thick coat. This tan completely washes off leaving your skin untanned.

Gloves are a must with this tan and a mitt is highly recommended

fake bake oil free moisturiser
Fake Bake's oils free moisturiser is great its exactly what its intended for and you can use this while tanned if your skin is getting a little dry and it should help to maintain your tan evenly.

Some people may find this a little pricey for moisturiser and id agree you can get cheaper oil free moisturisers such as this Nivea one.

Self-Tanning Tool For Back/Hard To Reach Areas

self tanning back tool
You can also pick on of these up from boots however they are just a little more expensive,
and can i just say what a great invention.

Hope youve all enjoyed this post and found it helpful.


Share:

Sunday, 24 January 2016

MY FAVOURITE SMOOTHIE & IT BENEFITS

As you might know from my Some Of My Christmas Goddies post I got a Nutribullet for christmas and its my new bestfriend. Ive made loads of different smoothies using some recipes from the fab book that came with the Nutribullet but also making some of my own smoothie recipes up as I go along, and this recipe has to be my favourite so far. So here it is...

Apple, Celery, Lime, Pear and Mint

homemade smoothie
  
1x Apple 
Apple Juice Or Water
1-2 Sticks Of Celery
1/2 A Large Lime Or 1 Whole Small Lime
1 Juicy Pear
Around 8-12 Leaves Of Mint 

smoothie ingredients

First wash all of the ingredients before use, then cut them up into chunks ready for blending.
Blend the celery, apple, pear, half a limes juice, 8 mint leaves and some apple juice or water (as much as you want depending on your desired consistency).

smoothie ingredients

Now taste your smoothie and decide if you would like to add more mint and lime juice. 
I do it this way as the lime juice especially can be overpowering and make the smoothie taste very sour and this way you can taste as you go along making sure you don't ruin the taste of the smoothie. With the right amount of these this smoothie tastes amazing I assure you!

If you want to add a little antioxidant boost to this smoothie you can add 1-2 dessert spoonfuls of Organic Barley Grass can be shopped Here. This is optional as you will most likely be able to taste the Barley Grass in the smoothie however I personally like the taste and add it to lots of smoothies I make. If you choose to use Barley Grass and want to dilute the taste a bit I advise using apple juice instead of water in this recipe.

smoothie ingredients

Here are some of the possible health benefits from each ingredient of this smoothie:

Apple -
Reduce the risk of Alzheimers/Parkinsons/Dementia/Strokes
Prevents Cancer
Decrease the risk of Diabetes
Reduce the risk of Cholesterol
Promotes good heart health 
Helps in the prevention of  Gallstones
Relives Constipation
Neutralise IBS
Control weight
Detoxify your Liver 
Helps in the prevention of Cataracts
Promotes good lung health

Pears -
Helps prevent high blood pressure
Helps prevent Cancer
Lowers Cholesterol
Promotes good colon health
Relives Constipation
Promotes good energy levels in the body
Relives Fever
Boosts immune system
Anti inflammatory effects on the body
Helps in the Prevention of Osteoporosis

Celery -
Lowers blood pressure 
Helps Prevent Cancer
Aids Heartburn
Aids Digestion
Boosts immune system
Reduces Asthma symptoms 
Promotes good cardiovascular health
Relives Migraines
Helps Prevent UTIs

Lime -
Promotes good skin health
Aids digestion
Aids Constipation 
Helps prevent Diabetes/ regulates blood sugar levels
Lowers blood pressure/ prevents heart disease
Promotes good eye health
Prevents Gout

Mint -
Aids digestion
Aids memory loss
Promotes weight loss
Prevents cancer
Promotes good skin health 
Helps menstural camps/pain
Boosts immune system

Barley Grass -
Anti-oxidant power
Boosts immune system
Helps prevent cancer
Protection from free radicals
Fights addictions and cravings
Alkalizing effects on the body
Rich in Vitamin E, Iron and Zinc

(I have collected this information through my own personal research on the internet)

Hope you all enjoy this recipe and feel the benefits!


Share:

Friday, 22 January 2016

ZARA SS16 TOP PICKS


Share:

Monday, 4 January 2016

NEW YEARS EVE OUTFIT

new years eve topshop dress
Hey, hope you all have a amazing NYE! 

This year I helped organise a Red Carpet themed party at my friends house and this is what I wore. 
This dress is by far one of the most spectacular dressed I've ever worn. I was shocked at how comfy the dress was given its covered in sequins and they usually only mean one thing ... ITCHY!
I got this dress in the Topshop sale reduced from £75 to just £25!!! A absolute steal at that price. The dress wasn't featured on their website and you'd have to hurry to grab one in store before they're all gone. I paired this look with a dark deep plum lip colour: Sleek True Colour Lipstick in shade Mulberry

Heres to a great 2016
Share:

SOME OF MY CHRISTMAS GOODIES

christmas presents
Let me start by saying I know I'm shockingly late with this post but I've been busy this festive period. This post is just to share with you some of the goodies I got for christmas and am incredibly grateful for! ( It looks like way more than it is most of those bags are empty)

My fav prezzie this year has to be my Nutribullet! Ive wanted one for agessss and I finally got it, I make smoothies every day now. Its a incredible blender I think the word they like is 'extractor' and it comes with loads of amazing recipes for smoothies soups and more.
I highly recommend the Nutribullet.
John Lewis

Victoria secret make up bag: this bag is amazing it has two zipped compartments plus a inside zipped pocket and two more unzipped inside pockets. I needed a big one as I carry around so much make up with me I'm forever growing out of my make up bags.
Victoria Secret

Victoria secret PINK undies: I love these undies they're so comfy and look great on.
Victoria Secret

Chanel Chance Perfume: I love this perfume its my favourite yet! I will most defiantly be purchasing some more of this baby when I run out.
John Lewis

Real Techniques Brushes: these are amazing brushes give great application and no annoying bristles fall out will be building on my collection of these.
Boots

Real Techniques Brush Cleaner: yet to try
Boots

B. Beauty Blender: this blender is the best ive used so far its super soft
Boots

Smashbox Contour Stick Trio: I asked for these this christmas and I'm so glad I did they are fab I much prefer these to my contouring power pallete
Boots: Smashbox

Tan Heeled Boots
Newlook

Palmers Coconut Oil Shampoo/Conditioner: My favourite shampoo and conditioner as I've talked about in one of my previous posts 
Superdrug

Palmers Cocoa Butter Moisturising Tan: My all time favourite moisturising tans and believe me I've tried loads! this one is the least patchy, gives a great colour and can give a deep tan from just one application the trick is to apply one coat at night wait for it to dry then apply another and by morning your a tanned babe. You do get a fake tan smell with this tan but I'm yet to find one that hasn't. (always wear gloves if not rinse hand throughly!) 
Superdrug

Grey Chunky Knit Cropped Jumper
Zara

Olaf PJs 
Unicorn Socks
Fox 2016 Diary/Planner
Hairbands
LOVE sign battery lamp
All Primark

Hope you all had a fab Christmas! 
X


Share:
© ROBYN SAMANTHA | All rights reserved.
Blogger Template Designed by pipdig