Friday, 3 June 2016

12 BEAUTY HACKS

Here's 12 beauty hacks to make your beauty regime that little bit easier...

1.Bronze and highlight your face in a number 3 shape - this gives you a quick contoured look

2.Blow dry your hair upside down - blow drying your hair upside down can make your hair look more volumised

3.Wash your make up brushes with shampoo - a cheap, effective and easy way to keep your brushes clean
Apply conditioner to make up brushes and let them soak - a cheap, effective and easy way to prolong the life of your brushes and keep them soft.

4.Make your lips look a little bigger using a little highlighter - apply to your cupids bow and centre of your bottom lip

5.Make your hair look a little thicker using eyeshadow - apply eyeshadow in the shade of your hair colour along your parting to give it the illusion of being thicker (this works best with darker hair but still gives a subtle effect on lighter hair shades)


6.Add extra grip to your hair grips - spray your hair grips with hairspray before using them

7.Paint french tips easily using a rubber band - using a rubber band wrapped around the tip of your
finger is a easy a quick way to paint the perfect straight french tips on the first attempt.

8.Get longer lasting curly lashes - heat your eyelash curlers with a hair dryer before using them this will get a better curl that lasts longer.

9.Exfoliate dry lips with your toothbrush and some lip balm - this will help get rid of dry skin and moisturise them

10.Dry your nail polish quicker by dipping your nails into cold water

11.Conceal under your eyes in a triangular shape - this gives a more effective concealed look and will hide dark circles better than using a semi circle or dotting technique

12.Tie your hair in a high and low ponytail for a longer looking ponytail/hair

Do you have any beauty hacks?
Have you tried any of these hacks?
Which hack is your favourite?


Share:

Monday, 30 May 2016

HOW TO DEAL WITH DRY SKIN

Overall I have normal/dry skin but I get periods where I have patches of dry skin all over my face and dealing with it can be a nightmare. In this post I'm going to share some tips for how to deal with dry skin and also some products I have come across that eased my dry skin.

Tips
Moisturise you skin whilst its damp - this can help lock in moisture
Don't use hot water on your skin - hot water can dry out your skin use warm water instead to minimise the risk of drying out your skin
Use makeup wipes specifically for dry skin - I used to use baby wipes to take of my make up but I find these dry out my skin when I switched to make up wipes for dry skin I really noticed the difference.
Drink plenty of water - keep your skin hydrated through out the day
Add some moisturising bath oil to your bath- this really minimises the risk of your skin drying out after bathing/showering
Use soap free products- soap can really have a drying effect on your skin
Limit cleansing your face to once a day - over cleansing can remove any natural oils from your skin and make it dry.
Get a humidifier for your bedroom - this puts moisture into the air and will help in preventing your skin drying out while your sleep.
My Top products for dry skin


Share:

Sunday, 22 May 2016

A ALL NATURAL WAY TO MOISTURISE YOUR SKIN

I found Dames and Dimes and asked if they would like to send me product to try out. The product I chose was this Whipped Body Butter. What attracted me to Dames and Dimes was that their products are all handmade, high quality, natural products containing NO synthetic colours, NO synthetic fragrances and NO parabens. As you'll know if you read my blog I harp on about how important our skin is being the biggest organ of our body, and how we quite often neglect it. Another fab thing to do for your skin is Dry Brushing check out my post about that here 
Dames and Dime's Whipped Body Butter is made with organic unrefined african shea butter. It has a consistency almost the same as coconut oil as when you touch it it starts to melt. It also feels more like a oil as appose to a moisturiser which to be honest I prefer, if you have dry skin like me moisturiser lasts two seconds on my skin before I need more, I found the butters effects fairly long lasting. Another thing I found because of the consistency is that a little of this butter goes a long way.
The only kind of downside to this butter (but then it is'nt really a downside) is that the smell is a very natural earthy smell but that's how it should smell! This product is natural at the end of the day and if you want to reap the benefits of natural products then these luxuries we've become accustomed too such as fancy smells are not too much to compromise are they? 

Although this butter is not fragranced it doesn't have a strong smell so you don't smell it once its applied. The ideal time to apply this butter I think would be straight out of the bath/shower when your skin needs a little hydration and I'd advise letting it sink in before putting on clothes. 

As Dames and Dimes products are natural they are suitable for sensitive skin. If your into your healthy alternative options then give these guys ago. 


Share:

Friday, 6 May 2016

BONDI SANDS GRADUAL TANNING MILK REVIEW

I'd been wanting to try Bondi Sands tan or ages after seeing all those beautiful brown legged selfies on instagram. When I saw Bondi sands on offer in Boots I thought nows a perfect time to try it out and let you guys know what I think. I use gradual tan regularly so I went for their Gradual Tanning milk. I have tried Dove, Garnier, No7 and Palmers, the main gradual tans on market, so I feel I can offer a good experienced opinion.

How I Found Bondi Sands
At £11.99 Bondi sands is double the £5.59 price tag of my usual Palmers gradual tan, so I was looking for it to be an improvement from the one I always use. First off the smell of the tan was like cocoa butter and it didn't have that 'tan smell' that my boyfriends always going on about. Its smell was also more subtle than all other tans I've tried.

After applying the tan I found it soaked in really quickly, usually I take ages to dry and my clothes are getting stuck to me. When I woke up I wasn't sticky at all but I felt like my skin was moisturised, most of the time when I apply gradual tans I'm sticky until I shower. I also noticed that from one application I had a very faint tan and that this was indeed going to be a gradual tan. I find with the palmers tan that even from one application you can get a fairly good little tan, its does need a few layers to be a proper full on tan but the from one application you will certainly notice a difference.  So in a last minute attempt at tanning this tan would not be ideal. The little colour I did have was  however not patchy at all and a nice golden colour.

I applied another layer the following night and in the morning I had the same results as the first application just a little darker... Still not smelling like tan, not sticky or patchy. The colour however still wasn't as deep as I would like ... a great natural looking light glow but I am pale and do like to be a good few shades up the colour chart.

So I went on and did third application and again same results just darker.  At this point I had a tan I was happy with I wouldn't say it was a deep tan but it was even and looked great. I think I expected it to be quite dark as all of the pictures of developed tans I've seen have been deep tans, I think this may be the result of the tanning mousse. I just want to mention as well that I found this tan not as patchy on areas like your hands as much as other tans I've used.
There are pros and cons to this tan for me so that and it being more pricey than my usual tan is something I have to weigh up.  Overall this is a great quality tan and for someone who is happy with a GRADUAL medium tan I couldn't recommend it enough.

Have you tried Bondi Sands? What tan do you use?
Share:

Tuesday, 3 May 2016

HOW TO REMOVE GEL NAIL POLISH AT HOME

With this simple procedure there's no longer any need to pay to get your gel nails removed. 

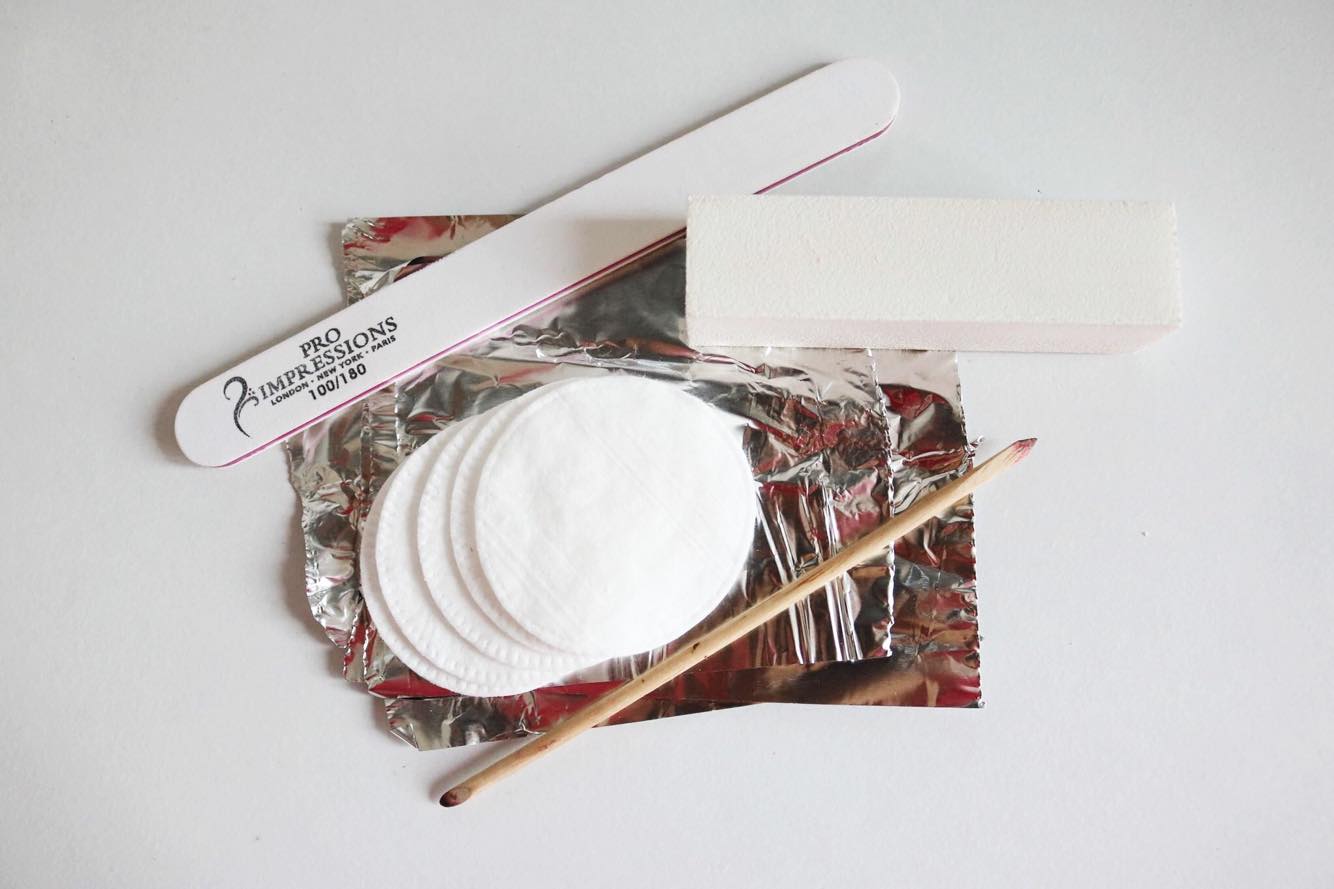
You will need: 
Tin Foil
A nail file
A nail buffer
Cotton pads 
Acetone
A orange wood stick or cuticle pusher

Here's how you do it...
1. Using a nail file, file the shine/top layer of your gel polish off of all your nails 
2. Cut you foil into squares (enough to wrap around your finger tips around 3x3 inches but this really doesn't need to be precise!)
3.Now place your cotton pads in the middle of your foil squares
4. Apply acetone to the cotton pads, you want the pads wet but not dripping 
5. Next place your nail downwards on the wet cotton pads ...
And fold the foil around your finger tip ensuring your nail is completely covered by the wet pad inside. 

6. Repeat for all fingers, you should end up with something like this ..
7.Now wait for approximately 10 minutes (YES I'm aware I mistakenly set the timer for 10 hours, I'm a ditsy human)
8. After 10 minutes are up slide one of your fingers out of the foil and using your orange stick or cuticle pusher gently scrape away the remaining gel polish. If the polish does not come off easily then put the foil and pad back over your finger and allow it some more time.  Repeat this for all fingers.
9. Once all your polish has been removed gently buff all of your nails.
10. Now if you wish moisturise your hands and smile that you saved yourself some money and a trip to the nail salon.

Alternatively
You can get these reusable caps and foams and remove your gels using the same procedure as the foils only applying acetone to the foam pads instead of cotton pads and using the caps instead of the foils. The foams are disposable but if you allow them to dry out after using them you will be able to get more uses out of them. You wet the rounded end of the foams and place them inside the caps you then slide your fingertips into the caps with the foam being on top of your nails and then follow the rest of the removal procedure. Some of the foam should be sticking out as this acts as a barrier to prevent any acetone from seeping out.  

I got these from my local Sally's Salon Services store but you can also pick these up online.


Share:

Thursday, 28 April 2016

SPRING/SUMMER POLISH PICKS

Yay were mid spring and summers round the corner, we can get out all those lovely shades of nail polish that are to OTT for the winter. Last summer I was in love with pastel colours and judging by my picks for this spring and summer it looks like I'm still loving them. 

Here are my top picks of OPI nails polishes for this spring/summer.
Are we there yet
Your Such A Budapest

My Very First Knockwerst
Suzi Shops N Island Hops

Thats Hula-rious

French Quarter For Your Thoughts


Share:
© ROBYN SAMANTHA | All rights reserved.
Blogger Template Designed by pipdig